Specifying a Spring Projection

Spring Data JPA makes it easy to interact with JPA data sources inside a Spring application.  Projections are a mechanism for returning a subset of data from a JPA repository. In this post I’ll discuss a unique way of specifying the desired projection when invoking repository methods.

Consider the following repository:

public interface UserRepository extends CrudRepository {}

A User entity is defined as:

public Long getId();
public String getUsername();
public String getPasswordHint();
public String getFullName();
public String getBio();

Assume we need to work with two different views of the user inside our application:  an in-network view consisting of id, username, fullName, bio and an out-of-network view consisting of id, username, fullName.

We’ll create two projections; these are simply interfaces that expose the desired property getters, e.g.

public interface ExternalUserView {
    public Long getId();
    public String getUsername();
    public String getFullName();
}

Projections are often utilized by adding new interface methods to the repository, e.g.

List<InternalUserView> finalAllInternalUsersBy();
List<ExternalUserView> finalAllExternalUsersBy();
...

However, this approach can lead to method clutter if you have several projections and/or custom query methods.  An improved approach involves passing the desired projection as a parameter:

<T> List<T> findAllBy(Class<T> clazz);
<T> Optional<T> findById(Long id, Class<T> clazz);

The projection can now be specified when calling a repository method, e.g.

List<InternalUserView> users = repo.findAllBy(InternalUserView.class);

If you’re making significant use of projections, consider using this approach to keep your code clean and terse. A working example is available here.

Full Stack Hosting in AWS – Part 2

In my previous post, we began the process of hosting an application based on ReactJS, Spring Boot, and MySQL inside of AWS.  We handled the prerequisites of registering our domain and obtaining a digital certificate.  Now we’re ready to host the back end components of our application.

RDS

Amazon Relational Database Service (RDS) is an easy way to host a relational database inside of AWS.  A variety of database types are supported; for this example we’ll be setting up a MySQL instance.

We will create a Dev/Test instance sized at t2.micro since this is just a demonstration exercise.  Also, we’ll specify “sample_db” for the initial database.  (Schema and Database are analogous in MySQL.)

  • The DB instance identifier is arbitrary.  However, you may want to give some thought to naming conventions if you’re as OCD about these sorts of things as I am.
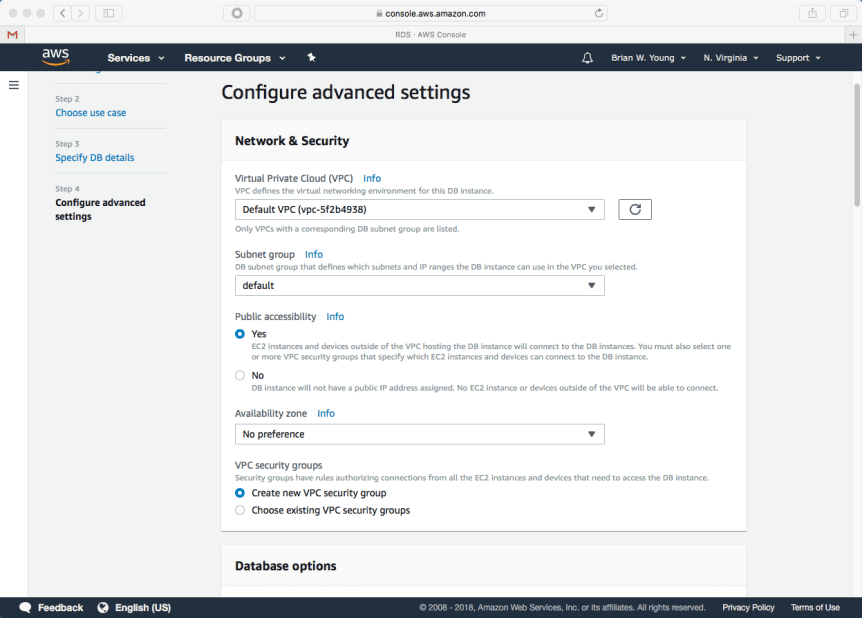
  • Selecting Publicly accessibility allows us to later whitelist our workstation’s public IP for direct access to the database- for example, via port 3306 from MySQL Workbench.
    • Note that this setting name is misleading; the instance isn’t visible to anything outside AWS until specific rules are added.
  •  username and password will be needed later in order to connect to the database.
  • Defaults for the rest of the advanced settings are often fine- I don’t advise changing them unless you have a good reason to do so.

rds-3

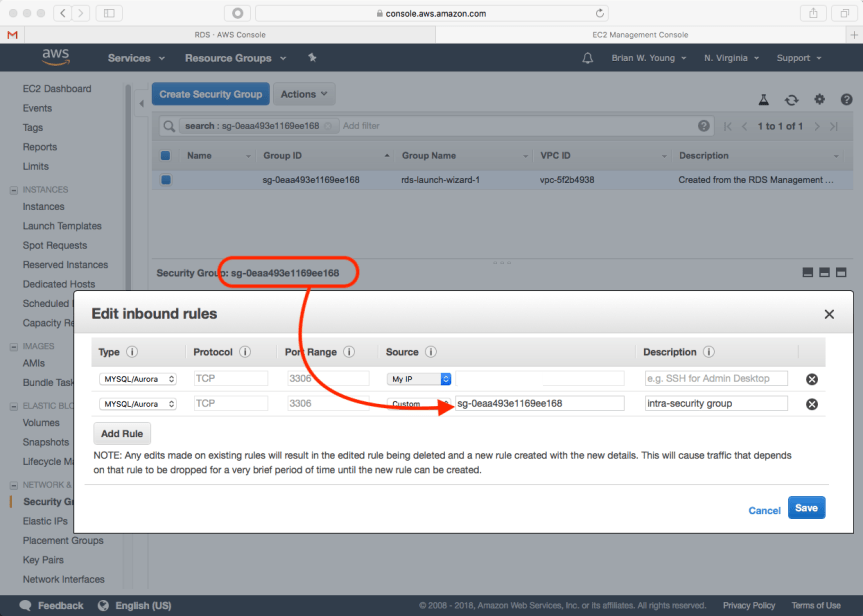
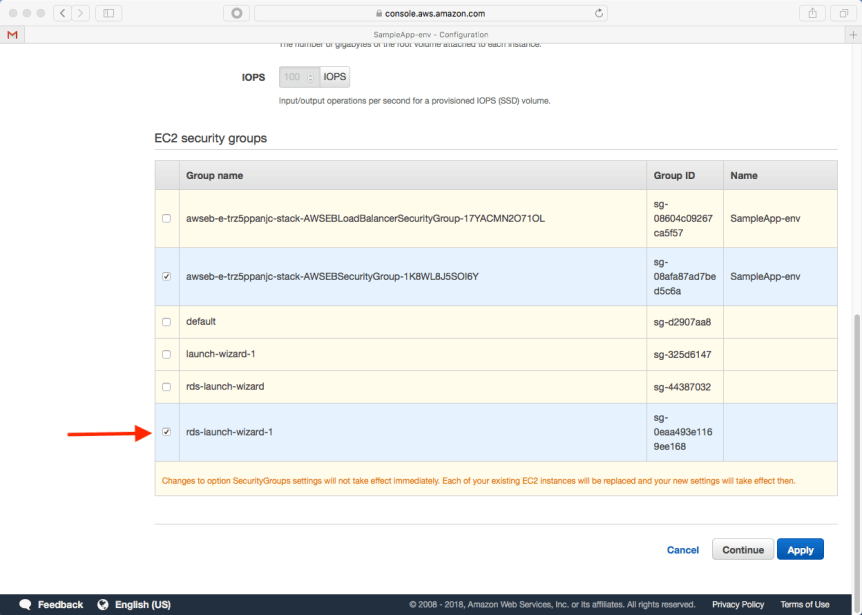
Before we leave RDS, we need to make a security change that will ultimately allow our Spring Boot application in Elastic Beanstalk to communicate with the MySQL instance.  We will edit our instance’s security group and add a rule that allows inbound traffic on 3306 from anyone that shares the same security group.  We can also add a rule allowing inbound traffic from our workstation.

rds-6

Elastic Beanstalk

Elastic Beanstalk is a scalable way to deploy web applications on AWS.  The Beanstalk’s Java SE environment is a perfect fit for a Spring Boot application.  Note that a variety of other application platforms are supported as well.

The sample Spring Boot application we’re using is available at GitHub.  Built it with Maven- the result of running mvn install is a single jar file: message-server-1.0-SNAPSHOT.jar.  This is the file we will deploy.

First, we need to create a new application inside of Elastic Beanstalk.  We’ll simply call it “sample app.”

An application has one or more environments.  For example, you might have a dev, qa, and production environment.  In this case we’re only creating only one environment. We’ll choose web server environment for the environment type.

  • The web server environment setup asks for help in naming the domain.  This isn’t especially important in our case since our front end is going to communicate with the back end via api.sample-app.com, not gibberish.us-east-1.elasticbeanstalk.com.
  • Select Preconfigured platform: Java.
  • Select Application code: upload code and upload the Spring Boot application jar.

At this point, Elastic Beanstalk is going to warn us that our application environment is in a degraded state.  Don’t worry about this; we don’t expect things to work properly yet since the configuration is incomplete.

Let’s go ahead and make the required changes.  All the changes are made from child pages of the main configuration dashboard shown below:

eb-5.png

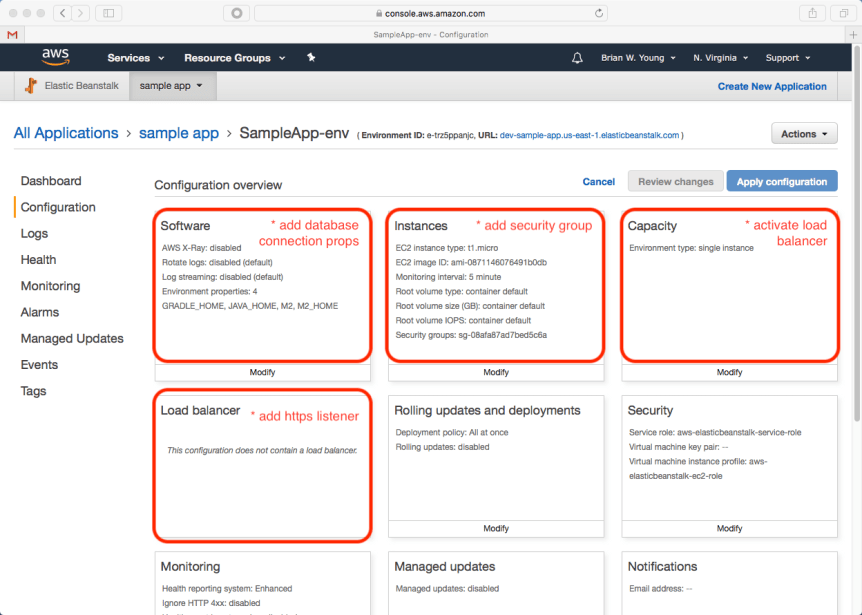
Software Configuration

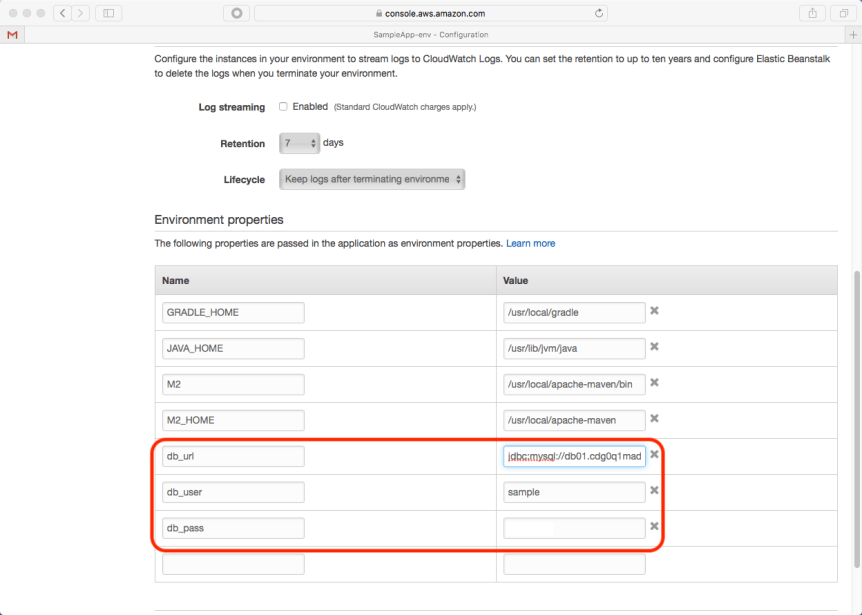
This section allows us to define system properties that are made available to our application.  This is useful for environment specific or sensitive properties.  For our sample application, we need to define the following:

  • db_url: jdbc:mysql://<host>:3306/sample_db (the host is shown in the RDS configuration)
  • db_user: the user provided during RDS setup
  • db_pass: the password provided during RDS setup

eb-16.png

Instances Configuration

To enable our application to communicate with the database, the RDS security group needs to be added.  This is the same security group that we modified when configuring RDS.

This is also the configuration area that allows us the change the ec2 instance type.  For our sample application, a t1 or t2 micro is sufficient.

eb-13.png

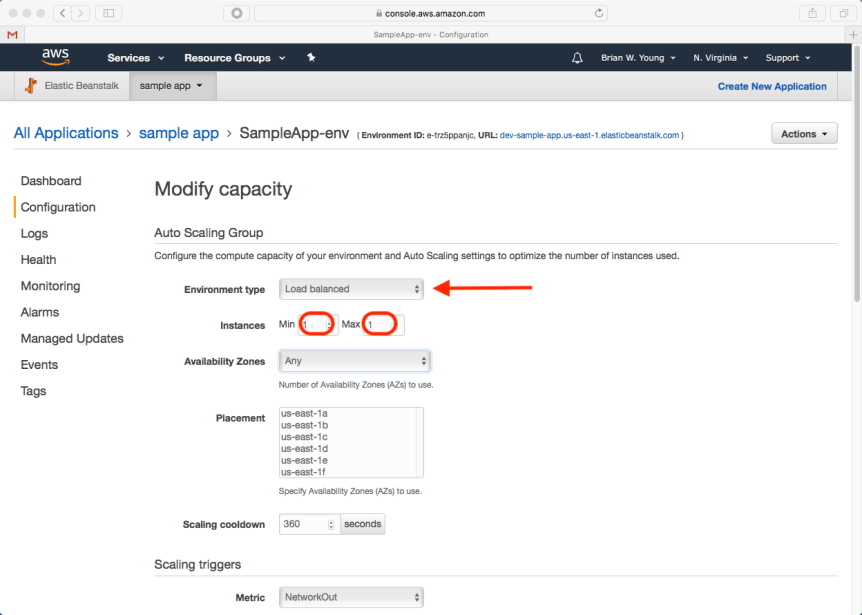
Capacity Configuration

We’ll change our environment to load balanced.  The addition of a load balancer gives us a place to establish an https listener.  Since we only need one application instance for this example, both the min and max instance counts can be set to 1.

eb-6.png

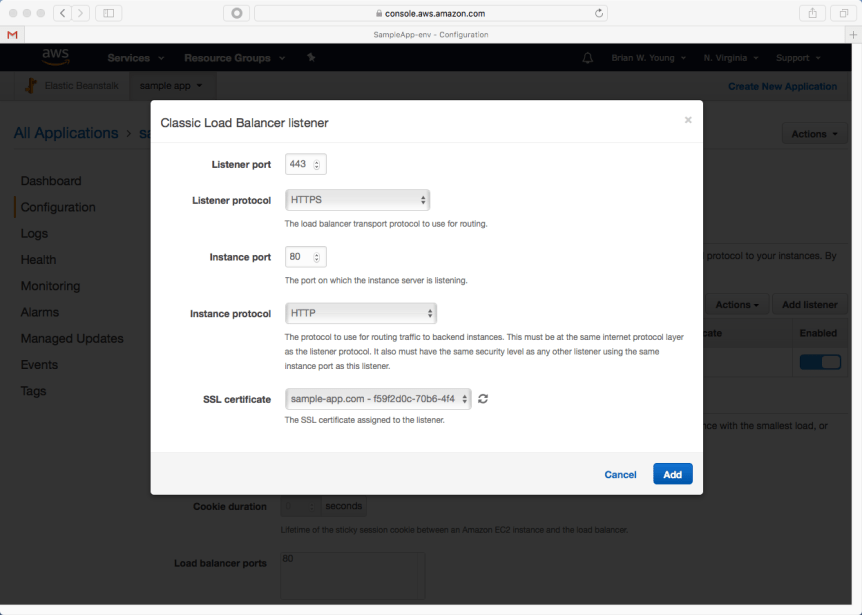
Load Balancer Configuration

We want our front end to communicate securely with the back end,  so we’ll create an https listener and associate our digital certificate with the listener.

  • Listener protocol & port: HTTP/443
  • Instance protocol & port: HTTP/80*
  • SSL certificate: select the SSL certificate created earlier.  If you recall, we added an alias to the certificate for api.sample-app.com.

* The Elastic Beanstalk Java environment uses nginx to map our application from port 5000 to port 80.  As a result, the load balancer’s listener(s) communicate with our instance over port 80.  By default, a Spring Boot application listens on port 8080, but the Beanstalk is expecting 5000.  The path of least resistance (seen in our sample app) is to tell Spring Boot to listen on port 5000 instead.

A final note- in production, I recommend removing the http:80 listener from the load balancer since nobody should be communicating with the back end over a non-secure port.

eb-10.png

I recommend restarting the environment after making the above configuration changes. The environment should be healthy after the restart.

Route 53

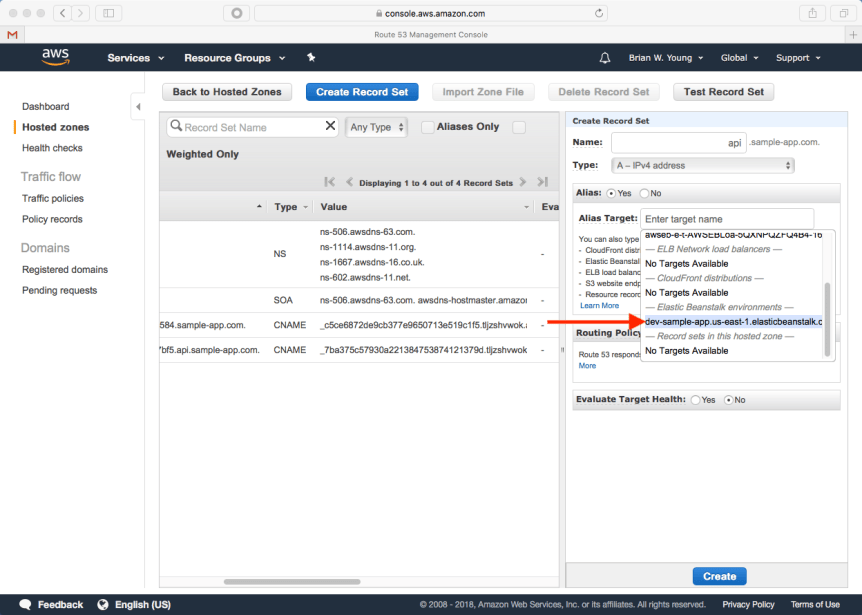
We need to pay a follow up visit to Route 53 to create an alias record that points to our Elastic Beanstalk environment.  We couldn’t have done this when we first set up our domain since at that point we didn’t have a Beanstalk environment.

The alias target field allows us to select our Beanstalk environment from a list.

r53-alias.png

Now we can verify the back end functionality by hitting one of our endpoints in a browser, e.g. https://api.sample-app.com/message:

api-results.png
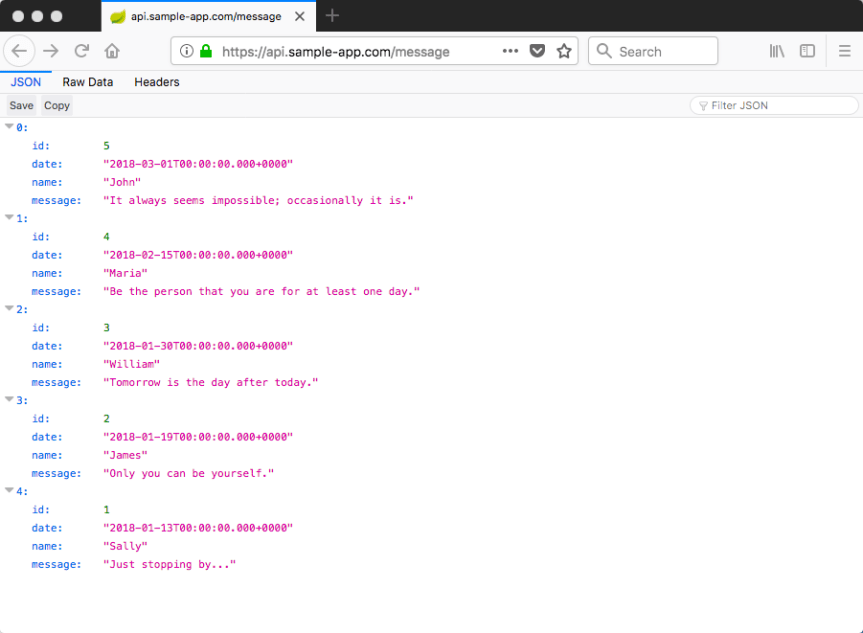
It works 🙂  In my next post, we’ll finish things up by hosting the front end.


JavaFX TreeView Drag & Drop

JavaFX’s TreeView is a powerful component, but the code required to implement some of the finer details is not necessarily obvious.

drag-dropThe ability to rearrange tree nodes via drag and drop is a feature that users typically expect in a tree component.  A drag image and a drop location hint should also be employed to enhance usability.  In this post, we’ll explore an example that handles all of these things.

Note to Swing Developers

TreeView is fundamentally different from Swing’s JTree.   While JTree’s cell renderer uses a single component to “rubber stamp” each cell, TreeView’s cells are actual components.  TreeView creates enough cells to satisfy the needs of viewport, and these cells scan be reused as the user scrolls and interacts with the tree.  This approach allows custom cells to be interactive; for example, a cell may contain a clickable button or other component.  Facilitating this type of interaction with JTree required some hackery since the cell was only a “picture” of the actual component.

Creating a TreeView

Creating a TreeView is straightforward.  For the sake of this example, I’ve simply hard coded a few nodes.

TreeItem rootItem = new TreeItem(new TaskNode("Tasks"));
rootItem.setExpanded(true);

ObservableList children = rootItem.getChildren();
children.add(new TreeItem(new TaskNode("do laundry")));
children.add(new TreeItem(new TaskNode("get groceries")));
children.add(new TreeItem(new TaskNode("drink beer")));
children.add(new TreeItem(new TaskNode("defrag hard drive")));
children.add(new TreeItem(new TaskNode("walk dog")));
children.add(new TreeItem(new TaskNode("buy beer")));

TreeView tree = new TreeView(rootItem);
tree.setCellFactory(new TaskCellFactory());

Creating Cells

The cell factory is more interesting. With JTree, drag and drop was registered at the tree level.  With TreeView, the individual cells participate directly.  Drag event handlers must be set for each cell that is created:

cell.setOnDragDetected((MouseEvent event) -> dragDetected(event, cell, treeView));
cell.setOnDragOver((DragEvent event) -> dragOver(event, cell, treeView));
cell.setOnDragDropped((DragEvent event) -> drop(event, cell, treeView));
cell.setOnDragDone((DragEvent event) -> clearDropLocation());

Drag Detected

Inside dragDetected(), we must decide whether a node is actually draggable. If it is, the underlying value is added to the clipboard content.

private void dragDetected(MouseEvent event, TreeCell treeCell, TreeView treeView) {
    draggedItem = treeCell.getTreeItem();

    // root can't be dragged
    if (draggedItem.getParent() == null) return;
    Dragboard db = treeCell.startDragAndDrop(TransferMode.MOVE);

    ClipboardContent content = new ClipboardContent();
    content.put(JAVA_FORMAT, draggedItem.getValue());
    db.setContent(content);
    db.setDragView(treeCell.snapshot(null, null));
    event.consume();
}

Drag Over

Our dragOver() method is triggered when the user is dragging a node over the cell. In this method we must decide whether the node being dragged could be dropped in this location, and if so, set a style on this cell that yields a visual hint as to where the dragged node will be placed if dropped.

private void dragOver(DragEvent event, TreeCell treeCell, TreeView treeView) {
    if (!event.getDragboard().hasContent(JAVA_FORMAT)) return;
    TreeItem thisItem = treeCell.getTreeItem();

    // can't drop on itself
    if (draggedItem == null || thisItem == null || thisItem == draggedItem) return;
    // ignore if this is the root
    if (draggedItem.getParent() == null) {
        clearDropLocation();
        return;
    }

    event.acceptTransferModes(TransferMode.MOVE);
    if (!Objects.equals(dropZone, treeCell)) {
        clearDropLocation();
        this.dropZone = treeCell;
        dropZone.setStyle(DROP_HINT_STYLE);
    }
}

Drag Dropped

If a node is actually dropped, the drop() method handles removing the dropped node from the old location and adding it to the new location.

private void drop(DragEvent event, TreeCell treeCell, TreeView treeView) {
    Dragboard db = event.getDragboard();
    boolean success = false;
    if (!db.hasContent(JAVA_FORMAT)) return;

    TreeItem thisItem = treeCell.getTreeItem();
    TreeItem droppedItemParent = draggedItem.getParent();

    // remove from previous location
    droppedItemParent.getChildren().remove(draggedItem);

    // dropping on parent node makes it the first child
    if (Objects.equals(droppedItemParent, thisItem)) {
        thisItem.getChildren().add(0, draggedItem);
        treeView.getSelectionModel().select(draggedItem);
    }
    else {
        // add to new location
        int indexInParent = thisItem.getParent().getChildren().indexOf(thisItem);
        thisItem.getParent().getChildren().add(indexInParent + 1, draggedItem);
    }
    treeView.getSelectionModel().select(draggedItem);
    event.setDropCompleted(success);
}

Challenges

TreeItem is not serializable, so it cannot be placed on the clipboard when a drag is recognized. Instead, the value object behind the TreeItem is the more likely candidate for the clipboard. This is unfortunate, however, because downstream drag/drop event methods need to know the TreeItem that is being dragged and it would be convenient if it were on the clipboard. We have a couple of choices- store the dragged item in a variable (the approach taken in this example), or search the tree looking for the TreeItem that corresponds to the value object on the clipboard.

Conclusion

Adding D&D-based reordering to a TreeView isn’t difficult once you have the pattern to follow! Find the entire source of this example here.
 

Script Compilation with Nashorn

Many developers know that a new JavaScript engine called Nashorn was introduced in Java 8 as a replacement for the aging Rhino engine.  Recently, I (finally) had the opportunity to make use of the capability.

The project is a custom NiFi processor that utilizes a custom configuration-based data transformation engine.  The configurations make heavy use of JavaScript-based mappings to move and munge fields from a source schema into a target schema.  Our initial testing revealed rather lackluster performance.  JProfiler indicated that the hotspot was the script engine’s eval() method, which really wasn’t that helpful since I already knew that script execution was going to be the long pole in the tent.

It turned out that I had missed an opportunity during the initial implementation.  The Nashorn script engine implements Compilable, a functional interface that allows you to compile your script.

@Test
public void testWithCompilation() throws Exception {
    ScriptEngine engine = mgr.getEngineByName("nashorn");
    CompiledScript compiled = ((Compilable) engine).compile("value = 'junit';");
    for (int i = 0; i < 10000; i++) {
        Bindings bindings = engine.createBindings();
        compiled.eval(bindings);
        Object result = bindings.get("value");
        Assert.assertEquals(result, "junit");
    }
}

@Test
public void testWithoutCompilation() throws Exception {
    for (int i = 0; i < 10000; i++) {
        ScriptEngine engine = mgr.getEngineByName("nashorn");
        engine.eval("value = 'junit';");
        Object result = engine.get("value");
        Assert.assertEquals(result, "junit");
    }
}

junit

As you can see, the difference is substantial across a test of 10,000 invocations.  A batch size of a few million records is pretty ordinary for the system that uses this component, so this represents a huge time savings.

I should also mention that the script engine is thread safe.  For concurrent use, each thread simply needs to obtain a fresh bindings instance from the engine as shown in the code above.

I get the impression that Nashorn may be an underutilized feature in the JDK.  However, script-based extensibility in an application can be quite valuable in certain scenarios.  Nashorn is worth keeping in mind for your future projects.

Lightweight Entity Extractor

Named Entity Recognition (NER) or entity extraction has a wide array of use cases, from processing customer correspondence (help desks, feedback systems, etc.) to data foresnsics.

NER solutions come in all shapes and sizes.   Libraries like GATE and Stanford NLP have been popular options for many years.  Commercial products like NetOwl and Rosette offer enterprise capabilities that can be installed on-premise.  Newcomers such as Amazon Comprehend offer pay-as-you-go cloud-only solutions.

Sometimes a use case calls for extracting everything possible from a document, or the area of concern may be so broad that it isn’t feasible to develop an effective lexicon and set of patterns.  Solutions fit for this problem are typically more complex and involve a lot of behind-the-scenes natural language processing.

In other scenarios, the use case might be more targeted.  For example, perhaps you need to find all occurrences of specific organizations and persons along with any identifable telephone numbers and email addresses.

If you are working with a specific lexicon and set of patterns, some of the larger frameworks or products may introduce an undesirable complexity and/or cost.  The signal to noise ratio may be higher that desired as well.  In these cases, many choose to roll a homegrown solution.  Unfortunately, these solutions are often based exclusively on regex or simple string evaluation and as a result may neither perform well nor yield quality results.

I recently built a lightweight Java library for handling lexicon-based and pattern-based extraction.  It processes a 25K word document with a lexicon consisting of 50K entries in about 130 milliseconds on a mid 2015 MacBook.  Increasing the lexicon to 500K items yields results in around 230 ms.  A sample signature block processed using a targeted lexicon and set of patterns is shown below.

sig-example

Perhaps you’ll find some use for this in your application or data pipeline.  Happy extracting!